Writeup HTB Impossible Password
This is a small walkthrough of the hackthebox reversing challenge Impossible Password.
I solved this challenge with two different approaches and want to show you both. For this purpose, I will be using the demo version of Binary Ninja and Ghidra. There are also more ways to solve this challenge, especially with dynamic analysis. However, I will solve this challenge with static analysis. I will show you how to patch the binary with Binary Ninja and how to reverse the algorithm with Ghidra and rewrite it in python.
I like to test out different approaches and also different tools. It is quite impressive how different the disassembly of Ghidra, Binary Ninja, IDA, and radare2 is. So often it is a good idea to look at a binary with different tools. Especially if you are new to reversing like I am.
Initial Analysis
First, we need to download the executable and unzip it. Then it is a good idea to run the file command against it, to see what we are dealing with.
challenges/reversing/imbossible_password
➜ file impossible_password.bin
impossible_password.bin: ELF 64-bit LSB executable, x86-64, version 1 (SYSV), dynamically linked, interpreter /lib64/l, for GNU/Linux 2.6.32, BuildID[sha1]=ba116ba1912a8c3779ddeb579404e2fdf34b1568, stripped
We know that its a 64-bit Linux ELF and it's stripped. That means that it does not contain any debug information.
Next, let's run the binary to see what happens.
Tatooine27:work:% ./impossible_password.bin
* Hello
[Hello]
If we run the binary, we are getting prompted for some input. We can type in something and after that, it will be printed out. So maybe we need the right password ?
Before we start the reversing, let's take a look at the strings of the binary with the strings command, because we can often find some very interesting strings in there, like flags, passwords and other hints.
challenges/reversing/imbossible_password took 3m 15s
➜ strings impossible_password.bin
/lib64/ld-linux-x86-64.so.2
libc.so.6
exit
srand
__isoc99_scanf
time
putchar
printf
malloc
strcmp
__libc_start_main
__gmon_start__
GLIBC_2.7
GLIBC_2.2.5
UH-x
UH-x
=1
[]A\A]A^A_
SuperSeKretKey
%20s
[%s]
x;*3$"
GCC: (GNU) 4.8.5 20150623 (Red Hat 4.8.5-11)
.shstrtab
.interp
.note.ABI-tag
.note.gnu.build-id
.gnu.hash
.dynsym
.dynstr
.gnu.version
.gnu.version_r
.rela.dyn
.rela.plt
.init
.text
.fini
.rodata
.eh_frame_hdr
.eh_frame
.init_array
.fini_array
.jcr
.dynamic
.got
.got.plt
.data
.bss
.comment
And we got lucky, because the SuperSeKretKey string looks quite promising.
Tatooine27:work:% ./impossible_password.bin
* SuperSeKretKey
[SuperSeKretKey]
** SuperSeKretKey
Very interesting. So after we enter the SuperSeKretKey as an input, it will be printed out, but unlike the last time, we are now prompted for another input. So it looks like a multilevel password protection. We found the first password and now need to find the second one.
If we want we can also do a more dynamic approach and use ltrace and strace to see which syscalls are made.
Tatooine27:work:% ltrace ./impossible_password.bin
__libc_start_main(0x40085d, 1, 0x7fff9f872ef8, 0x4009e0 <unfinished ...>
printf("* ")                                                                                                                                                             = 2
__isoc99_scanf(0x400a82, 0x7fff9f872de0, 0, 0* SuperSeKretKey
)                                                                                                                           = 1
printf("[%s]\n", "SuperSeKretKey"[SuperSeKretKey]
)                                                                                                                                       = 17
strcmp("SuperSeKretKey", "SuperSeKretKey")                                                                                                                               = 0
printf("** ")                                                                                                                                                            = 3
__isoc99_scanf(0x400a82, 0x7fff9f872de0, 0, 0** SuperSeKretKey
)                                                                                                                           = 1
time(0)                                                                                                                                                                  = 1595504186
srand(0x6f7ae399, 10, 0x6dfd3c88, 0)                                                                                                                                     = 0
malloc(21)                                                                                                                                                               = 0x128dac0
rand(0, 0, 33, 0x128dad0)                                                                                                                                                = 0x7d0e4d6f
rand(0x7f6f23a50740, 0x7fff9f872d44, 0x128dac0, 94)                                                                                                                      = 0xb0f868a
rand(0x7f6f23a50740, 0x7fff9f872d44, 0x128dac1, 94)                                                                                                                      = 0x1f1d27a9
rand(0x7f6f23a50740, 0x7fff9f872d44, 0x128dac2, 94)                                                                                                                      = 0x252ae486
rand(0x7f6f23a50740, 0x7fff9f872d44, 0x128dac3, 94)                                                                                                                      = 0x17e448d6
rand(0x7f6f23a50740, 0x7fff9f872d44, 0x128dac4, 94)                                                                                                                      = 0x197db5a8
rand(0x7f6f23a50740, 0x7fff9f872d44, 0x128dac5, 94)                                                                                                                      = 0x67cd88df
rand(0x7f6f23a50740, 0x7fff9f872d44, 0x128dac6, 94)                                                                                                                      = 0x1ad1ff05
rand(0x7f6f23a50740, 0x7fff9f872d44, 0x128dac7, 94)                                                                                                                      = 0x4e714e60
rand(0x7f6f23a50740, 0x7fff9f872d44, 0x128dac8, 94)                                                                                                                      = 0x617d1914
rand(0x7f6f23a50740, 0x7fff9f872d44, 0x128dac9, 94)                                                                                                                      = 0x3ca27c57
rand(0x7f6f23a50740, 0x7fff9f872d44, 0x128daca, 94)                                                                                                                      = 0x4e7a1ca0
rand(0x7f6f23a50740, 0x7fff9f872d44, 0x128dacb, 94)                                                                                                                      = 0x85e4c38
rand(0x7f6f23a50740, 0x7fff9f872d44, 0x128dacc, 94)                                                                                                                      = 0x1d7b83ae
rand(0x7f6f23a50740, 0x7fff9f872d44, 0x128dacd, 94)                                                                                                                      = 0x39debb3b
rand(0x7f6f23a50740, 0x7fff9f872d44, 0x128dace, 94)                                                                                                                      = 0x77f0e992
rand(0x7f6f23a50740, 0x7fff9f872d44, 0x128dacf, 94)                                                                                                                      = 0x7ab9e1b4
rand(0x7f6f23a50740, 0x7fff9f872d44, 0x128dad0, 94)                                                                                                                      = 0x6800a53
rand(0x7f6f23a50740, 0x7fff9f872d44, 0x128dad1, 94)                                                                                                                      = 0x25350490
rand(0x7f6f23a50740, 0x7fff9f872d44, 0x128dad2, 94)                                                                                                                      = 0x24478442
strcmp("SuperSeKretKey", "6Q63Q34*g=x}gk\\YchCU")                                                                                                                        = 29
+++ exited (status 29) +++
We can clearly see the __isoc99_scanf command to read our input. Then it will print out the input with
printf("[%s]\n", "SuperSeKretKey"[SuperSeKretKey]And then compare our input with the expected string. In this case with SuperSeKretKey as it is the right password.
strcmp("SuperSeKretKey", "SuperSeKretKey")Then we reach the "2. Level" where we can input the second password.
printf("** ")
__isoc99_scanf(...)
After that, we see some very weird calls time() and rand() to generate some random data.
We supplied SuperSeKretKey as the second password and on the last line, we see again a string compare.
strcmp("SuperSeKretKey", "6Q63Q34*g=x}gk\\YchCU")Where our input (SuperSeKretKey) is compared to another string (6Q63Q34*g=x}gk\\YchCU) . So the second password, in this case is 6Q63Q34*g=x}gk\\YchCU.
Let's try it out:
Tatooine27:work:% ./impossible_password.bin
* SuperSeKretKey
[SuperSeKretKey]
** 6Q63Q34*g=x}gk\\YchCU
Hm, it is not working. Let's double-check this with ltrace to see what's happening.
Tatooine27:work:% ltrace ./impossible_password.bin
__libc_start_main(0x40085d, 1, 0x7ffc6cdf4ac8, 0x4009e0 <unfinished ...>
printf("* ")                                                                                                                                                             = 2
__isoc99_scanf(0x400a82, 0x7ffc6cdf49b0, 0, 0* SuperSeKretKey
)                                                                                                                           = 1
printf("[%s]\n", "SuperSeKretKey"[SuperSeKretKey]
)                                                                                                                                       = 17
strcmp("SuperSeKretKey", "SuperSeKretKey")                                                                                                                               = 0
printf("** ")                                                                                                                                                            = 3
__isoc99_scanf(0x400a82, 0x7ffc6cdf49b0, 0, 0** 6Q63Q34*g=x}gk\\YchCU
)                                                                                                                           = 1
time(0)                                                                                                                                                                  = 1595504786
srand(0x6f7b1279, 21, 0x6dfd6b68, 0)                                                                                                                                     = 0
malloc(21)                                                                                                                                                               = 0xe96ac0
rand(0, 0, 33, 0xe96ad0)                                                                                                                                                 = 0x44bfd455
rand(0x7fad44332740, 0x7ffc6cdf4914, 0xe96ac0, 94)                                                                                                                       = 0x3f873cb5
rand(0x7fad44332740, 0x7ffc6cdf4914, 0xe96ac1, 94)                                                                                                                       = 0x4299ee25
rand(0x7fad44332740, 0x7ffc6cdf4914, 0xe96ac2, 94)                                                                                                                       = 0xbd2cd75
rand(0x7fad44332740, 0x7ffc6cdf4914, 0xe96ac3, 94)                                                                                                                       = 0x44631ed8
rand(0x7fad44332740, 0x7ffc6cdf4914, 0xe96ac4, 94)                                                                                                                       = 0x4c769bd2
rand(0x7fad44332740, 0x7ffc6cdf4914, 0xe96ac5, 94)                                                                                                                       = 0x4890c1b4
rand(0x7fad44332740, 0x7ffc6cdf4914, 0xe96ac6, 94)                                                                                                                       = 0x409906e2
rand(0x7fad44332740, 0x7ffc6cdf4914, 0xe96ac7, 94)                                                                                                                       = 0x92428cf
rand(0x7fad44332740, 0x7ffc6cdf4914, 0xe96ac8, 94)                                                                                                                       = 0x2e2525f1
rand(0x7fad44332740, 0x7ffc6cdf4914, 0xe96ac9, 94)                                                                                                                       = 0x4e45198d
rand(0x7fad44332740, 0x7ffc6cdf4914, 0xe96aca, 94)                                                                                                                       = 0x422de01e
rand(0x7fad44332740, 0x7ffc6cdf4914, 0xe96acb, 94)                                                                                                                       = 0x303fdf15
rand(0x7fad44332740, 0x7ffc6cdf4914, 0xe96acc, 94)                                                                                                                       = 0x4e56c4bd
rand(0x7fad44332740, 0x7ffc6cdf4914, 0xe96acd, 94)                                                                                                                       = 0x777dd640
rand(0x7fad44332740, 0x7ffc6cdf4914, 0xe96ace, 94)                                                                                                                       = 0x60d63d5c
rand(0x7fad44332740, 0x7ffc6cdf4914, 0xe96acf, 94)                                                                                                                       = 0x3fcdd39f
rand(0x7fad44332740, 0x7ffc6cdf4914, 0xe96ad0, 94)                                                                                                                       = 0x499b9ec8
rand(0x7fad44332740, 0x7ffc6cdf4914, 0xe96ad1, 94)                                                                                                                       = 0x1a00c9ef
rand(0x7fad44332740, 0x7ffc6cdf4914, 0xe96ad2, 94)                                                                                                                       = 0x70451522
strcmp("6Q63Q34*g=x}gk\\\\YchC", "<R:~GW]G6FLE\\x{-x_P/")                                                                                                                = -6
+++ exited (status 250) +++
We basically just need the last line:
strcmp("6Q63Q34*g=x}gk\\\\YchC", "<R:~GW]G6FLE\\x{-x_P/")And we see, that the second password seems to be dynamic, as it changes on runtime. Which makes sense if we consider the calls to time() and rand(). Without really knowing what is happening, we can at least assume that the second password will be somehow generated based on a timestamp and some random data.
Now it is time to dive into the disassembly and understand what's happening.
Binary Ninja
Let's open the binary in Binary Ninja. We will see the following graph.
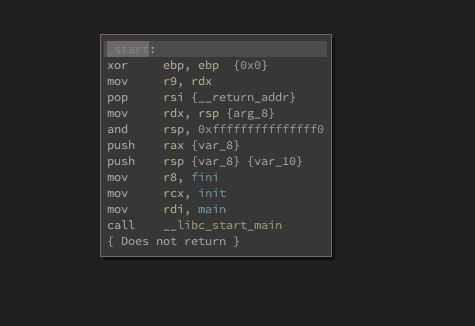
Often, you can follow the call and end up in the main program loop, but if we follow the call we will end up in a dead-end. The reason is that this a call to __libc_start_main. So let's google it and see what it does:
https://refspecs.linuxbase.org/LSB_3.1.0/LSB-generic/LSB-generic/baselib---libc-start-main-.html
The libc_start_main() function shall perform any necessary initialization of the execution environment, call the main function with appropriate arguments, and handle the return from main(). If the main() function returns, the return value shall be passed to the exit() function.
If we now take a close look we see the arguments in the disassembly and one of them is called main. After we double click it, we get to the real main routine of the binary.
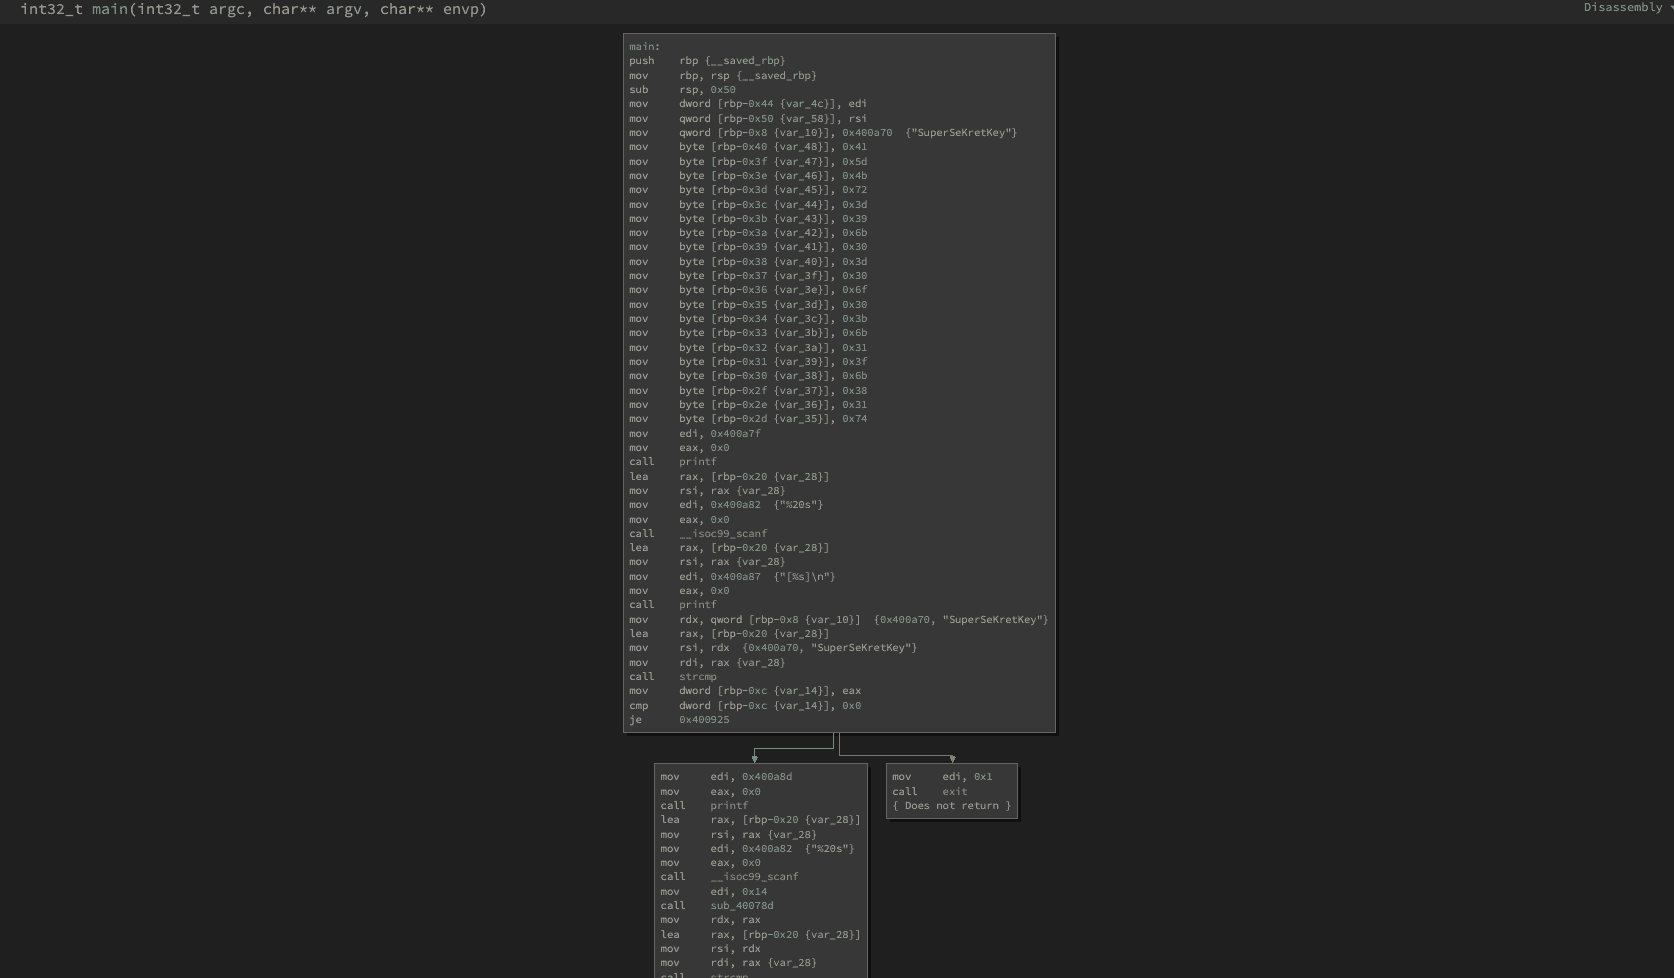
Now we can analyze the routine. The cool part is, that we do not need to understand every little piece of the assembly. Mostly it is enough to understand the bigger picture.
Main Routine
Let's go over some pieces of the assembly.
mov     qword [rbp-0x8 {var_10}], 0x400a70  {"SuperSeKretKey"}
mov     byte [rbp-0x40 {var_48}], 0x41
mov     byte [rbp-0x3f {var_47}], 0x5d
mov     byte [rbp-0x3e {var_46}], 0x4b
mov     byte [rbp-0x3d {var_45}], 0x72
mov     byte [rbp-0x3c {var_44}], 0x3d
mov     byte [rbp-0x3b {var_43}], 0x39
mov     byte [rbp-0x3a {var_42}], 0x6b
mov     byte [rbp-0x39 {var_41}], 0x30
mov     byte [rbp-0x38 {var_40}], 0x3d
mov     byte [rbp-0x37 {var_3f}], 0x30
mov     byte [rbp-0x36 {var_3e}], 0x6f
mov     byte [rbp-0x35 {var_3d}], 0x30
mov     byte [rbp-0x34 {var_3c}], 0x3b
mov     byte [rbp-0x33 {var_3b}], 0x6b
mov     byte [rbp-0x32 {var_3a}], 0x31
mov     byte [rbp-0x31 {var_39}], 0x3f
mov     byte [rbp-0x30 {var_38}], 0x6b
mov     byte [rbp-0x2f {var_37}], 0x38
mov     byte [rbp-0x2e {var_36}], 0x31
mov     byte [rbp-0x2d {var_35}], 0x74
This looks quite interesting. We can instantly see our password in there. So this looks like some kind of variable declarations. It is important to try to rename variables and methods as much as possible, to help understanding the code.
In this case we can assume that var_10 is our level 1 password. So we can mark it and hit N on the keyboard or right click and Rename Variable...
And type in level1_password.
Then we look at the other parts, which should be easy to understand.
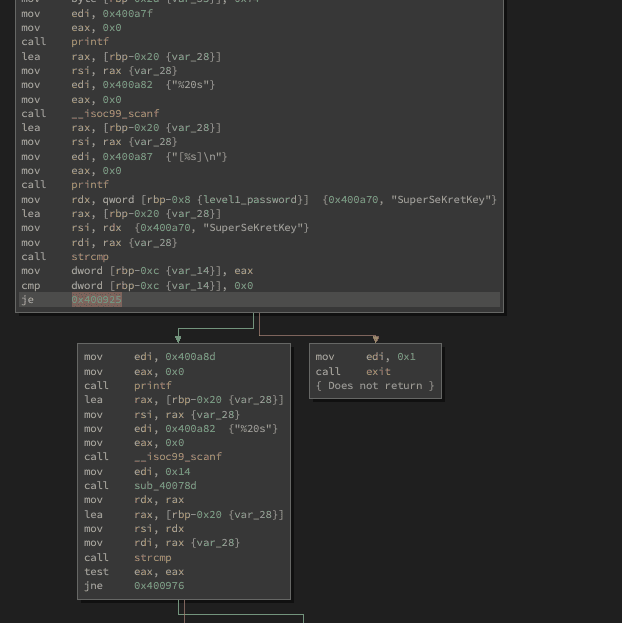
We see for example a call to printf which will most likely print out the * .
Then there is the call to __isoc99_scanf for reading our input. Followed by another printf which will return our input. And last but not least a call to strcmp to compare our input with the required password. We already know this flow from the ltrace output. After that, we see a conditional jump
je 0x400925je stands here for jump if equal.
This makes total sense. Because we are using strcmp to check if the two passwords are identical and then we will most likely have an if-condition to call the level 2 subroutine or exit the program.
Level 2 Subroutine
mov     edi, 0x400a8d
mov     eax, 0x0
call    printf
lea     rax, [rbp-0x20 {var_28}]
mov     rsi, rax {var_28}
mov     edi, 0x400a82  {"%20s"}
mov     eax, 0x0
call    __isoc99_scanf
mov     edi, 0x14
call    sub_40078d
mov     rdx, rax
lea     rax, [rbp-0x20 {var_28}]
mov     rsi, rdx
mov     rdi, rax {var_28}
call    strcmp
test    eax, eax
jne     0x400976
Here is our subroutine for the second password.
Now we do not need to understand everything what's happening here. If we just look at the calls we see the printf and __isoc99_scanf, which will be the user input.
Then we see the call to another subroutine
call sub_40078dAnd after that we see
call    strcmp
test    eax, eax
jne     0x400976
So we again comparing our input with another string, performing a test and again a conditional jump.
As we remember from the ltrace the password was changing after each execution. And we assumed that is because it will be generated based on the time and some random data. And we have only one call to a subroutine in there.
So we can assume that
call sub_40078dis our password generation function. We can right-click on this entry and select Rename Symbol and type in generate_password. So the function will be renamed.
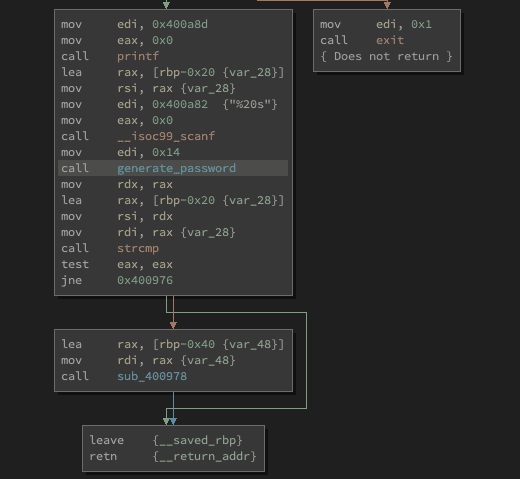
Now, we could double click on generate_password to take a look at the subroutine. And we will see the calls to time, srand, malloc and rand.
So yeah, without fully understanding it, we can assume this will generate the password, randomly.
Is this important? Not really. Because let's take a look at the condition.
jne 0x400976JNE stand for jump if not equal. And jumping to the program exit. Otherwise, we are jumping to
lea     rax, [rbp-0x40 {var_48}]
mov     rdi, rax {var_48}
call    sub_400978
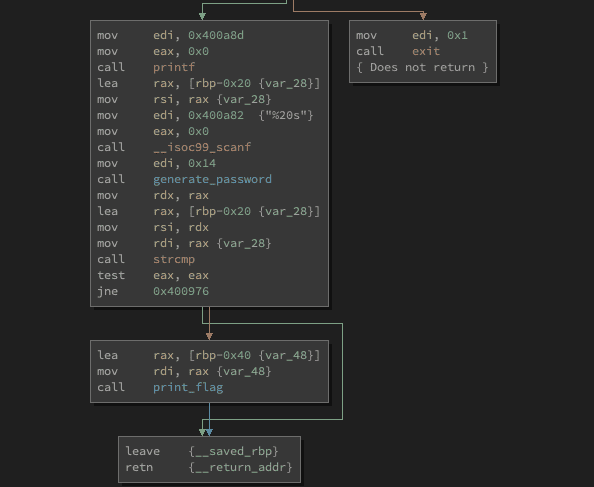
And here we have another call to a subroutine. This could be the level 3.
Level 3 Subroutine
Let's go into the subroutine and take a look.
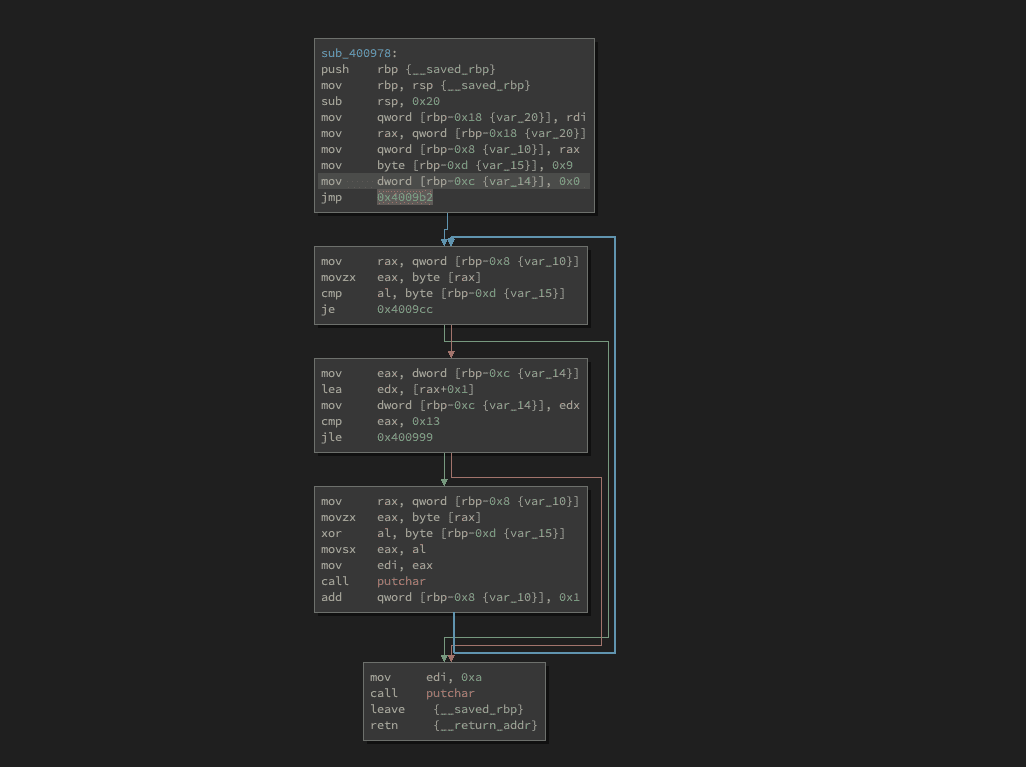
Now this subroutine looks quite different. We do not have and scanf calls and also no other subroutines. The only call we have is to putchar.
So we can assume that this routine will output our flag. So we can right-click on the subroutine name and select Rename Symbol or just press the N key. And rename it to print_flag.
If you are more experienced with reading disassembly you might see some known patterns here and know what's happening. However, let's assume you (and I) don't. We can take a look at the pseudocode. (Click tab key to switch view).

Well, don't worry if you do not understand this. The pseudo-code output of binary ninja isn't the best. And I also did not understand what is happening here.
But we see the function signature is passing a char pointer.
char* arg1And this will be assigned to a local variable.
00400988  char* var_10 = arg1
00400990  int32_t var_14 = 0
We also have a while loop, which is checking some stuff on var_10.
Another interesting line is:
rax_2:0.b = zx.q(zx.d(*var_10)):0.b ^ 9Even tho, it is quite complicated, we might recognize the ^ 9 part which is a Bitwise operation, a bitwise XOR.
So we could try to reverse the XOR algorithm and reproduce it. However, this will happen in the Ghidra part, as the Ghidra decompiler is way better and its easier to see what is happening.
But how do we solve this now with Binary Ninja, you might ask. Let's first conclude what we already know.
- We know the first password
SuperSeKretKey - Then we are prompted for a second password which will be generated
-
If we match it, we call the
print_flagroutine.' width='594' height='487' xlink:href='data:image/png%3bbase64%2ciVBORw0KGgoAAAANSUhEUgAAAEAAAAA0CAIAAAC1uKleAAAACXBIWXMAAAsSAAALEgHS3X78AAAJYUlEQVRo3s1aiXLayBad35iYxWCDWe3EIGvrXWptSCBsJ/Nq/v9D3mm1wSR24sl4ArnVpWoJIe7pu53b4o/uv5Xz8/PWhzOHe5Ob6Yc/P7Q7bSOt53F21hpeXMyGV5PBEGM6NOPlHGM8GBSuP7y4bHc6P6vGH9/7AMqMx%2bO7u7vFYuE4jrsTx7lbLB1cN/PlMiSh7/vO0rEDF70DwW1OM3D3bD7/cHY2nkxw%2bvHTp8Vyuf/0drGkfui5Lm7DubN7Pp5wc3PT%2bSGqNwAkSbLZbOI4flLIdZVkD9uiyGP8WpTHUaGTdZZuC12l%2bWNJJcN174UEQXA9n7dbrdl0muc5nqmUgooAD1Vjxbd1lqW44uGB0SqhguI5%2bNZ7AQghgIFzbpcER0ZJqhXnNAxC/IxIpEwUj4XMlMrigIT2zm8Eis7n81arNZ1OoyjCM3G0H%2bF%2bzkiaKCV5GIZYAqFlSM1z8K3r6%2bt/D2A0GuGX6rrGj%2bFxnmf8J1K83mSwgOf5IlHZfcG1XN4ujAstlq9q/w0ArH3RCFYHzunAAiKsErrSVPFgcbs0j3KevPFdAGABxhi0hwvBms1quYQEOmJJxAWjShAuqB8Ee1dxvRe6e18BmM1mUggpZCQVJTRovmsexVkY%2bIwQexGm8D2PEvJeANB%2btVplWSalbGLOzSJSxESLcJ3yKmHOwlk0QW2XzcRxc59ZWcfM7XVouQcQyQha1uVmW27KfCU436yqIi2gfJHm91WNi1mScsYB8r0AYOU0TaH93l8ZDeNISImocCll8N08iwRnCkctEdaEECWlUIIJjpVMVxkMiCiC6hYAVtc8yn3F2e4asRMcg8Zu7wIAbZA0gOHpB1yXhAHSxarQ%2bAgOBjD3dYb4E6mSqUIOCcIgjqJ0lSodCSXzqkAgYQng/VCl14gtI/9EOm9VhreDuKoqm/KeLMBIlkbQG14hBV2XieCUERbrOC0y3JNV%2bWq9Cjx/uVzi1JYR3Iy1t9p0flLeVcj2aXRv5SDwI8UiJRBqhIaJxuLCEkwqqZKIMorw1FrDg%2bEAEBORQXgI4L%2bVty2w3W6h0L4MI41%2bfkBYR0ijKo%2biMkEVQwnLHlb544pwgghOYl1mxZft42N9n%2bkUp6cBYC2AREQp3bsQJSGKMWc08ANTyLRE6UH6xDoHu3yKhW9CMPA936ZzXDmNBbD2lko0hcyzFnjY5ghi8AOmZVznLJZLU8fAke5MWdqnlH2eAbnwT2GByWRi8kwcow4csgk4CWpnoXnMw4cC6YdwGmQRLTRbadQj72U5Po0F4ELQG0ZAFoIXWQCokIIGSoR5TKE66loiicETs1KzSITfoxInC2LLHG0qhIeAOf7vc4nitVjciTyWII9VSgS7vV0%2bu5CBevdbWOAlFwrDQIG4IIoZCylhSlJDhxCuuwF/R970g0MMJwOAJA8uhGJsuRDyKNEZqz7TYitWW6ILVj6GKmVZqeq/ZHkvN59FeY9BlAYNcnfk7mQAkEYRA7DDcxrlPMti1DIzN7yIC8m9MNyxUc99hZGeNAbW6zViYJeCXEqCIotWueFCaEQ26xSEAnzBtIbLhoE2edNZ7tio49jW5GQxgM5jX4ntqqdaJrGEToxxELt6ncagD1UKKprUORi9jrXOE5A5wmh1v86yXO3I3LHrAKgvInjf/pk0GgY6FlmiTPtHKQK6RP4HwUebGUsWG46ElkWh7ZSCSw4YMCDS8bEB4MfgQiDS4ELAcNi/op/UsUTCgfN8vi%2bA57bpA00ebdqXZSPG60zYm9bmZFwIK2fbkUM2isDFANVBewlmgRYHQkx/QBDAlBtmik/vvm4pT8lGLRfaxQBZlylagjsXMUDu6zyJBbqvDI1gXSEAVnVZbSpG6GGDfxoAlgshAMCFMLHdHiM%2buIPihgvlEfW9Z%2bYDZ7E89OXexCkLGcIAUQgHaXicAQAKJFlQaLrNhaF2OwZqt%2bJ%2bIy4EAFAdlbgsS1sKIFKwdWVcaOm46MvgQmgvD1n07wXAuhDsAAtYAIwTrWUUI0UKqXhexFyw7y386QGASoCNwgi2Q0eCRKaP1qne5sWXKtnmmPNE2u3YHwi%2be7IgxtqbfbIDwSkaSLTrtmcPgsB/S/CV2XzW7rSPBwDS7/cvLi7s8VXp9/qj2fjTfH7Zu%2bj1%2bv0fjk6702kfF8CbezjtVmswHjrLT6PJaDi5uvrhGE1HGOe98%2bMBMCq%2bJa12O7i5GVxcdHtdKPf66Pcwuufd8Xx8ObyEKY7EheAkYGAIZQTDdCeTndj5aDQG/7yZzVC2J%2bPJeDQ2x/HBcTQe46PJ5PLicjAaHA8AVtfu5SMRIZTDnYBKcI4LZhMcHEkpCQqE/lJEZrcIR7M5JwQ1LSc1G70go%2bBGUs5n8wbA4HgA7OauTaM2G4IsgLqVq7gqE4ABADDTv/%2bqQEjR2kdVkj0U6I91FBfrQmcJV6L%2bcl/kBRYCphiMhscGgJU7bClNPxAEiZag06AOoNaRedNh3kpg%2bWVkduFVrNI8DZtNAIBBp2bfkcGLjm0BuDV4aFVVz2zUdWnorzIFBorkz0hQrzP0x/CnJEtASOE5WZVnRU6byr3vIjzfmx4fgO0HwKjzPLfvs%2b6cpS9UEGVhlPK09AgLVEL1ihcb1wsWt7dQFzXbabqZ5528ZlsSAX1sADD6no2ie7Qll0WaRbF5NyYjpjDhmKhyGzJuK3LwmiCWQCWOCgBpdDgcXl9f73PorBEkz5kZ0%2bZoTq8/fkKunR6k2peCL/bP%2b9D%2beGn0m0LW2svh3wla7dbZ2dX1x/5w0OufGz7xg9HvTT/OLq8GxwNw%2bCbrdYTtznA8/Oj7V9PxcDIEm3g5Gh4xMmN8dTUdAUa3c0QAexg9Q9aexL6ow6TTarvSk1/%2b7vUvzy3abjP2E/CHDnC296P7XxPqtwHYaEYQm53D3euWw%2bgMCX16MePt2HWT%2bO3G0c3NjWHRBl8zuqcAYDubuq7X6zUKM3Kr/StAJBXURgnLqyJbZZvHWiip8wSTLMtM1fhl20E/DQDLiWSKiobj09aD6xpOxM1Wu4wVyjCaTHChkJAIXELHljv9og25nwZg99m32y2W/6m9dBwlJFRkgid5WtalznSEEq2k2Rp62MAmkVBwv9MDsJukL4uU4XOCk4aZ2lM0mjBISELbZyIG4ELtX9CI/VwWssmn%2b%2bL/AU0qPci23a8Srr32S7WH/B8RHGfJD75UvwAAAABJRU5ErkJggg==' /%3e%3c/svg%3e)
So the only problem is the jne 0x400976 after the generate_password routine.
So let's change this instruction to a je so we only jumping to the exit of the program if our input is equal with the generated password. Which most likely will not happen. And jump to the routine where our flag is printed out.
So we can click on the instruction and select Patch -> Invert Branch
After that we go to File -> Save As and name the binary impossible_password_patched.bin.
So let's execute it:
Tatooine27:work:% ./impossible_password_patched.bin
* SuperSeKretKey
[SuperSeKretKey]
** Does not matter
HTB{.........}
And we got our flag.
Ghidra
After solving the challenge I wanted to take another route, without patching the binary. We know the first password. And we know that the second password is generated based on the timestamp of execution. So the chance that we can generate this statically is not very high :D But we know that there is another routine for printing our flag, which uses XOR. This sounds like something we could reverse.
Preface
Let's start by loading our binary into Ghidra and analyzing it.
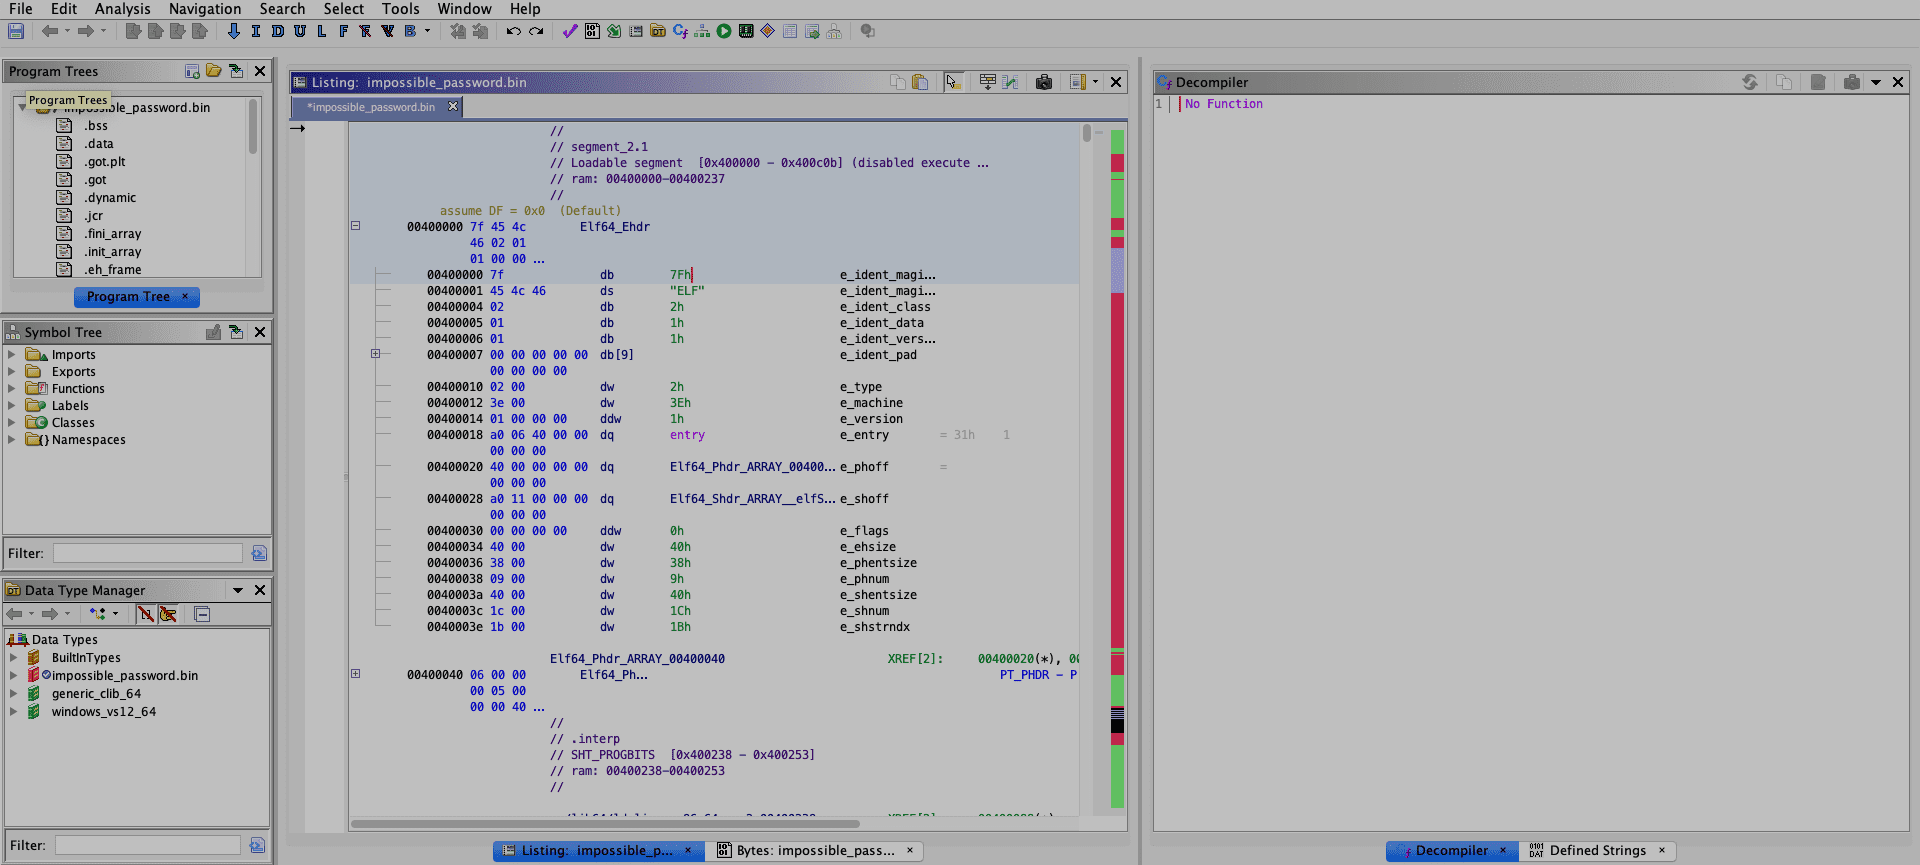
You instantly see, what we start off a different location as in Binary Ninja. We now need to find the main function.
For this, we take a look at the Symbol Tree and select the __libc_start_main and right-click it and select Show References To.
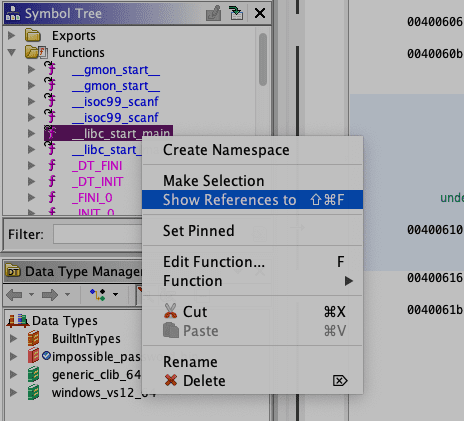
There should be only one occurrence, which we can double click and start, where we did in Binary Ninja.
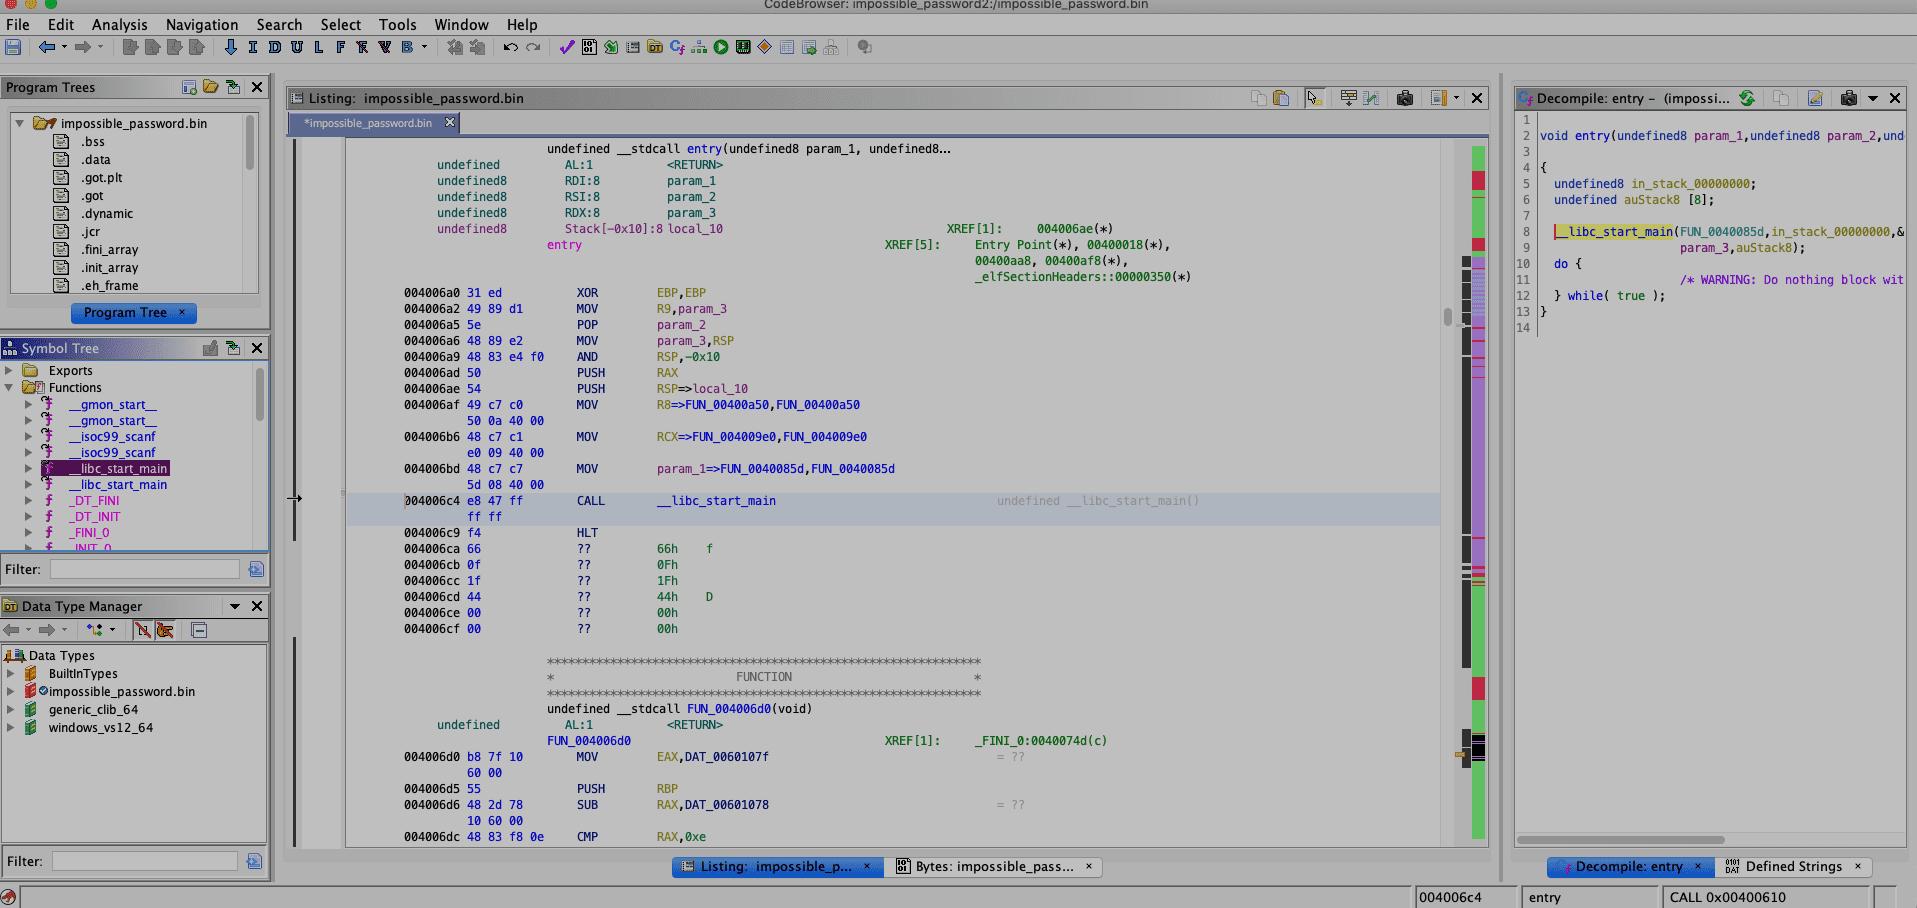
We see in the disassembly and also in the decompiler the parameters of __libc_start_main . The main function is called here FUN_0040085d
We can right-click there and select Edit Function and rename it to main.
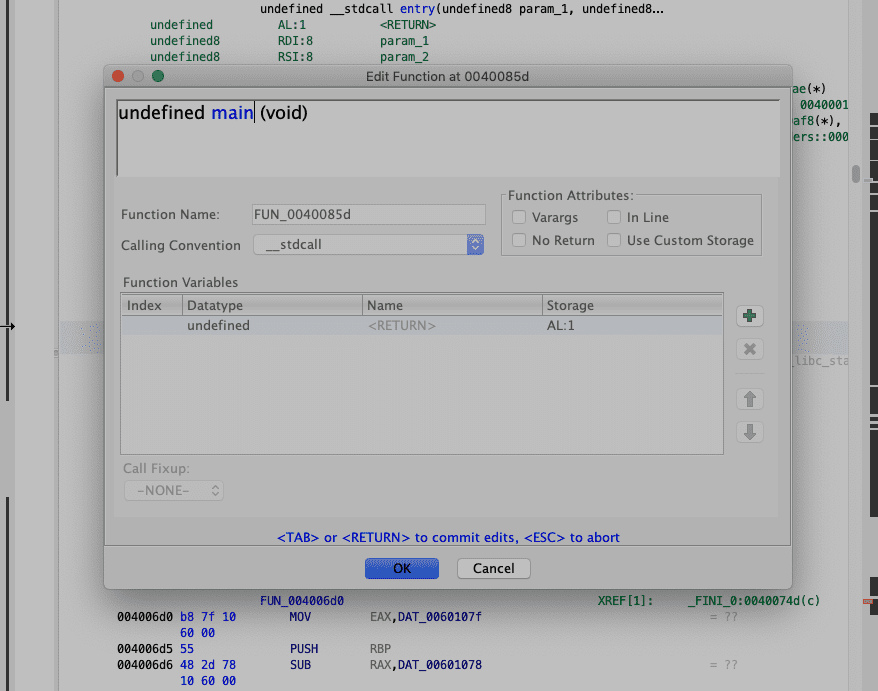
We see here pretty much the same we saw in Binary Ninja. So let's clean up a bit the function names and variables.
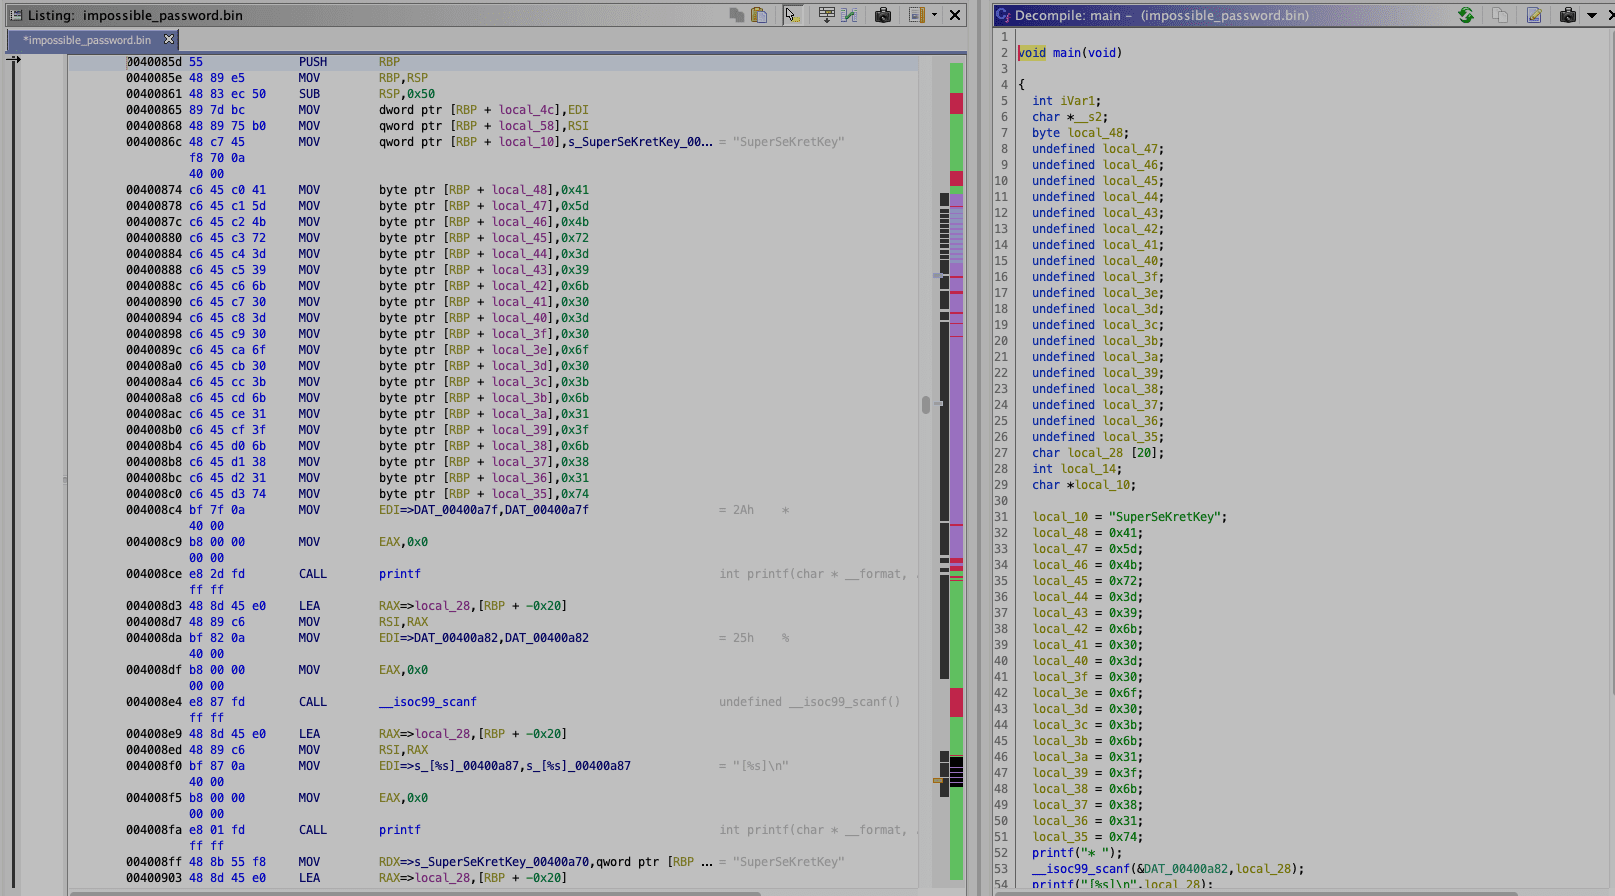
We can rename the password variable to level1_password like we did before.
And we can take a closer look at the instruction after that.
        00400874 c6 45 c0 41     MOV        byte ptr [RBP + local_48],0x41
        00400878 c6 45 c1 5d     MOV        byte ptr [RBP + local_47],0x5d
        0040087c c6 45 c2 4b     MOV        byte ptr [RBP + local_46],0x4b
        00400880 c6 45 c3 72     MOV        byte ptr [RBP + local_45],0x72
        00400884 c6 45 c4 3d     MOV        byte ptr [RBP + local_44],0x3d
        00400888 c6 45 c5 39     MOV        byte ptr [RBP + local_43],0x39
        0040088c c6 45 c6 6b     MOV        byte ptr [RBP + local_42],0x6b
        00400890 c6 45 c7 30     MOV        byte ptr [RBP + local_41],0x30
        00400894 c6 45 c8 3d     MOV        byte ptr [RBP + local_40],0x3d
        00400898 c6 45 c9 30     MOV        byte ptr [RBP + local_3f],0x30
        0040089c c6 45 ca 6f     MOV        byte ptr [RBP + local_3e],0x6f
        004008a0 c6 45 cb 30     MOV        byte ptr [RBP + local_3d],0x30
        004008a4 c6 45 cc 3b     MOV        byte ptr [RBP + local_3c],0x3b
        004008a8 c6 45 cd 6b     MOV        byte ptr [RBP + local_3b],0x6b
        004008ac c6 45 ce 31     MOV        byte ptr [RBP + local_3a],0x31
        004008b0 c6 45 cf 3f     MOV        byte ptr [RBP + local_39],0x3f
        004008b4 c6 45 d0 6b     MOV        byte ptr [RBP + local_38],0x6b
        004008b8 c6 45 d1 38     MOV        byte ptr [RBP + local_37],0x38
        004008bc c6 45 d2 31     MOV        byte ptr [RBP + local_36],0x31
        004008c0 c6 45 d3 74     MOV        byte ptr [RBP + local_35],0x74
This kinda looks like a definition of various chars. We can convert the hex to a char to see if we have only printable characters.
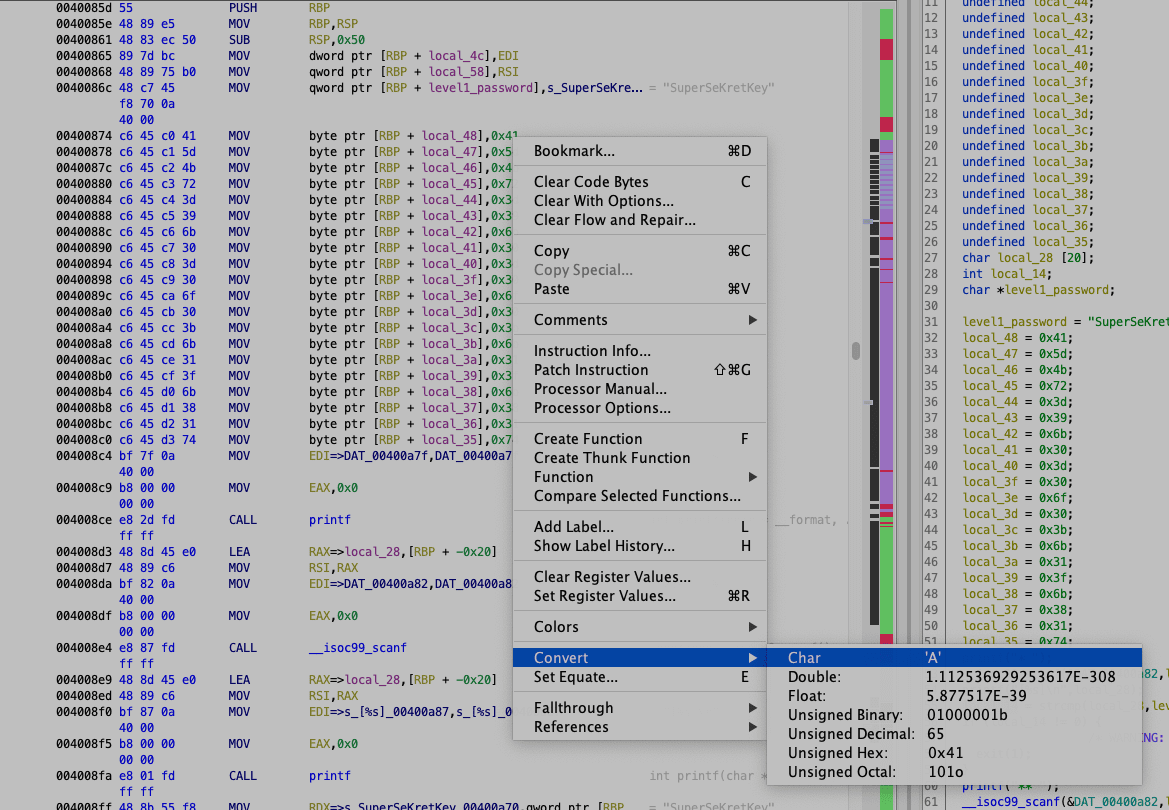
Note: I know that it is possible in IDA to mass convert this. However, did not found a way in Ghidra. So if anyone knows how to do it, send me a DM on twitter :)
The cool thing is, that the decompiler is quite nice and produces good output so we can easier rename variables and understand the flow.
Finally, we end up with the following code:
void main(void)

{
  int match;
  char *random_password;
  byte local_48;
  undefined local_47;
  undefined local_46;
  undefined local_45;
  undefined local_44;
  undefined local_43;
  undefined local_42;
  undefined local_41;
  undefined local_40;
  undefined local_3f;
  undefined local_3e;
  undefined local_3d;
  undefined local_3c;
  undefined local_3b;
  undefined local_3a;
  undefined local_39;
  undefined local_38;
  undefined local_37;
  undefined local_36;
  undefined local_35;
  char user_password_input [20];
  int did_password_match;
  char *level1_password;

  level1_password = "SuperSeKretKey";
  local_48 = 'A';
  local_47 = ']';
  local_46 = 'K';
  local_45 = 'r';
  local_44 = '=';
  local_43 = '9';
  local_42 = 'k';
  local_41 = '0';
  local_40 = '=';
  local_3f = '0';
  local_3e = 'o';
  local_3d = '0';
  local_3c = ';';
  local_3b = 'k';
  local_3a = '1';
  local_39 = '?';
  local_38 = 'k';
  local_37 = '8';
  local_36 = '1';
  local_35 = 't';
  printf("* ");
  __isoc99_scanf(&DAT_00400a82,user_password_input);
  printf("[%s]\n",user_password_input);
  did_password_match = strcmp(user_password_input,level1_password);
  if (did_password_match != 0) {
                    /* WARNING: Subroutine does not return */
    exit(1);
  }
  printf("** ");
  __isoc99_scanf(&DAT_00400a82,user_password_input);
  random_password = (char *)generate_password(0x14);
  match = strcmp(user_password_input,random_password);
  if (match == 0) {
    print_flag(&local_48);
  }
  return;
}
Ghidra obviously has some problems with the local_* variables.
Some observations:
local_48is used in as an argument in theprint_flagfunction.local_35tolocal_48containing single characters.
Assumptions:
local_35tolocal_48is containing our encrypted flag.- They are not individual variables. Because we are passing
local_48as an argument to ourprint_flagfunction. And it is not logical to only pass one character. So it rather is a pointer / array.
So we should first re-type the local_48 variable. It is a byte array not only a byte.
We select the local_48 variable, right click and Retype Variable and type in byte[20] . Because there are 20 characters as variables. We can also rename it to encrypted_flag
Now our decompilation looks like this:
void main(void)

{
  int match;
  char *random_password;
  byte encrypted_flag [20];
  char user_password_input [20];
  int did_password_match;
  char *level1_password;

  level1_password = "SuperSeKretKey";
  encrypted_flag[0] = 'A';
  encrypted_flag[1] = ']';
  encrypted_flag[2] = 'K';
  encrypted_flag[3] = 'r';
  encrypted_flag[4] = '=';
  encrypted_flag[5] = '9';
  encrypted_flag[6] = 'k';
  encrypted_flag[7] = '0';
  encrypted_flag[8] = '=';
  encrypted_flag[9] = '0';
  encrypted_flag[10] = 'o';
  encrypted_flag[11] = '0';
  encrypted_flag[12] = ';';
  encrypted_flag[13] = 'k';
  encrypted_flag[14] = '1';
  encrypted_flag[15] = '?';
  encrypted_flag[16] = 'k';
  encrypted_flag[17] = '8';
  encrypted_flag[18] = '1';
  encrypted_flag[19] = 't';
  printf("* ");
  __isoc99_scanf(&DAT_00400a82,user_password_input);
  printf("[%s]\n",user_password_input);
  did_password_match = strcmp(user_password_input,level1_password);
  if (did_password_match != 0) {
                    /* WARNING: Subroutine does not return */
    exit(1);
  }
  printf("** ");
  __isoc99_scanf(&DAT_00400a82,user_password_input);
  random_password = (char *)generate_password(0x14);
  match = strcmp(user_password_input,random_password);
  if (match == 0) {
    print_flag(encrypted_flag);
  }
  return;
}
This looks way better.
Print Flag
Now let's check out our print_flag function.
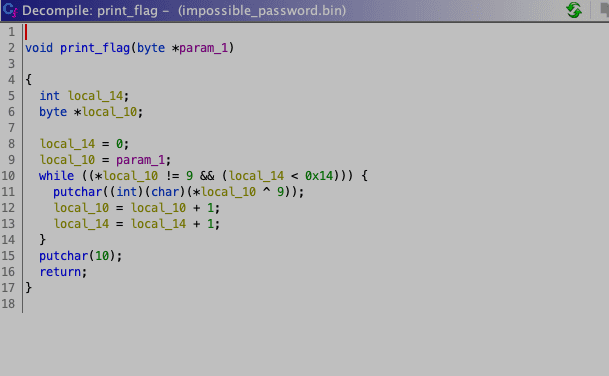
This looks way better then the Binary Ninja output.
Let's start by renaming some variables.
Our *param_1 is the encrypted flag byte array, which will get assigned to local_10. So let's rename it to encrypted_flag.
Next we have an int local_14. Which is used in the while loop:
local_14 < 0x14

// and

local_14 + local_14 + 1
So it looks like an index. And after renaming it to i we have following:
void print_flag(byte *param_1)

{
  int i;
  byte *encrypted_flag;

  i = 0;
  encrypted_flag = param_1;
  while ((*encrypted_flag != 9 && (i < 0x14))) {
    putchar((int)(char)(*encrypted_flag ^ 9));
    encrypted_flag = encrypted_flag + 1;
    i = i + 1;
  }
  putchar(10);
  return;
}
Now this looks really good. We are looping over our encrypted flag. And have two conditions to exit the loop.
*encrypted_flag != 9, 9 in ascii is\ti < 0x14.0x14in decimal is 20.
Then we call putchar and XOR'ing the encrypted flag character with 9.
After that increasing encrypted_flag with 1 and increasing our index with 1.
Now the encrypted_flag = encrypted_flag + 1; looks quite weird. But as we know it is a byte array, we can assume that the index is increasing, so it iterates over each character in that array.
Solving with python
Now we have all information we need to recreate this in for example python.
First we copy our encrypted flag:
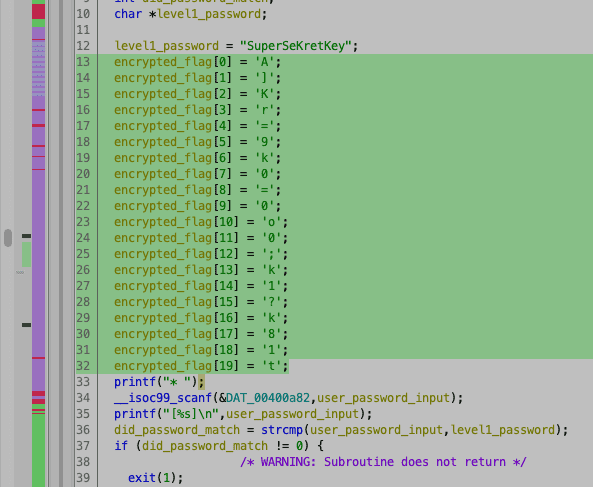
and in our python script we create an array with it.
#!/usr/bin/env python2

flag_characters = ['A',']','K','r','=','9','k','0','=','0','o','0',';','k','1','?','k','8','1','t']
And we know that our xor base or key is 9 and we know i is initialized with 0.
xor_key = 9
i = 0
flag = []
Then we can recreate the while loop. It is looping over all characters in the array.
while i < len(key_list):Then we need to XOR each character with 9 (our xor key)
However we have stored the flag characters as ascii characters, thus we need to call ord() on them to properly xor them with an integer.
xored = ord(flag_characters[i]) ^ xor_keyThen we need to increase i by 1. And store or xored character in the flag array. As we previously used ord() we now have an interger in xored and need to call chr() on it, to get the ascii character.
flag.append(chr(xored))
i += 1
Finally we join the array to a single string and print it out.
flag_string = "".join(flag)
print "Flag is: {}".format(flag_string)
So we can run it:
➜ python solve.py
Flag is: HTB{----------}
And we got our flag :)
Full Script
#!/usr/bin/env python2

flag_characters = ['A',']','K','r','=','9','k','0','=','0','o','0',';','k','1','?','k','8','1','t']
xor_key = 9

flag = []
i = 0
while i < len(flag_characters):
	xored = ord(flag_characters[i]) ^ xor_key
	flag.append(chr(xored))
	i += 1

flag_string = "".join(flag)
print "Flag is: {}".format(flag_string)